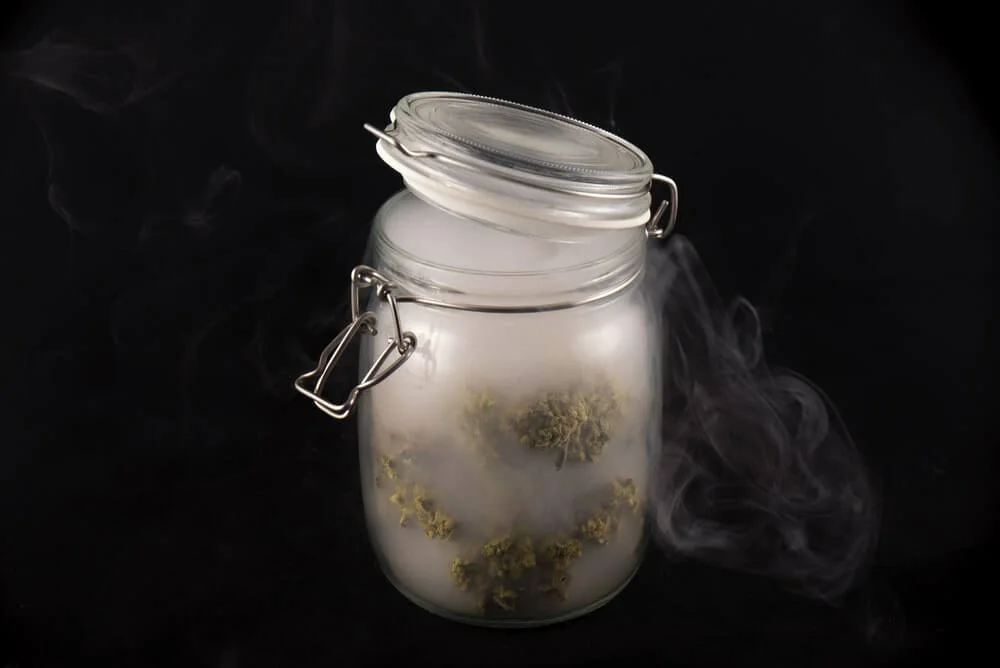
How Long Should I Burp My Jars When Curing?
It’s the age-old question: how long should i burp my jars when curing?
The short answer is, as long as you keep your buds in a jar, they will need to be burped at least occasionally as they will still produce some gases. That is unless you are storing them in a vacuum-packed container. Burping your jar of marijuana, however, can be dangerous if not done properly.
If you are not a medical cannabis patient, then it is highly recommended that you only ever burp your jars no more than every three days of storage. If you are a medical patient and want to go longer, then it’s recommended that you only do so every two days of storage.
*** see page: What is Good Soil for Growing Cannabis?
And finally… If the plant material was just sitting on top of some type of container for 5+ years and allowed to naturally dry out (such as a paper bag), then once again there should be no more than every 3 days of storage.
What is Burping?
Can you burp your jars to cure them?
Yes, you can. You can even burp to cure. However, it’s not a good idea .
That is because if you don’t use the right technique and cause the jars to bubble too much, they will become moldy and will not grow again. The best way to cure your jars is by using a bubbler. A bubbler is a tank that contains water with air bubbles in it. We will be talking about how we can use a bubbler for curing our jars of plants.
There are two types of bubblers: glass or plastic .
Glass Bubblers are the easiest to use since you just have to pour in the water and let it fill up the bubble zone of the tank . You don’t need anything else . Plastic Bubblers are different from glass ones because they come with an air pocket inside them that controls when the bubbles begin to form and when they overflow into the water .
The bubbles then start popping out of the water , this is what makes them so effective at curing jar-filled plants . Once your jar has been cured, simply open up its lid and let some air out so that some of its contents will escape , then close its lid again until all of its contents are released into the air in order for it to be safe for you to open again once more
The best thing about having a bubbler is that you don’t need much space at all , but on top of that , it doesn’t have any unnecessary or complicated parts . Just make sure that no one else uses your garden walls before you put your jars on there , unless maybe someone else has already used yours before you had any idea about using an airtight container as well …
The Importance of Burping During the Curing Process
So many people have a misconception that they can just leave their jars in the sun or under direct sunlight for days on end and not have to burp them. That’s where they get it wrong.
As mentioned earlier, it is important to make sure your jars are not too wet or too dry. It is also important to make sure that the jars are not exposed to direct sunlight.
Ideally, you want your jar to be in a location that receives at least 4 hours of direct sunlight per day and stay in that location for at least 2 hours per day but no more than 6 hours per day.
Also, if possible, try placing your jar far from any heat sources such as radiators or heat registers (especially if you live in an area prone to winter snow/freezing)
If you do decide you must burp your jars more frequently, here are some guidelines:
The amount of time you need to burp depends on how old your buds are, how much time they spend in the jar, and how much time the jar is exposed to sunlight.
The exact method will vary depending on the number of buds being cured at one time as well as the ambient temperature. The general rule of thumb is 20% exhaled air every week or two; however there may be exceptions depending on individual circumstances.
For example:
1) If there are 8 clove/spice buds being cured each week for 3 weeks , then about 15% would be exhaled air every week;
2) If there are 10 cloves/spice buds being cured each week for 3 weeks , then about 20% would be exhaled air every week;
3) If there are 12 cloves/spice buds being cured each week for 4 weeks , then about 30% would be exhaled air every week; and
4) If there are 14 cloves/spice buds being cured each week for 5 weeks , then about 40% would be exhaled air every week; and
When Can I Stop Burping My Jars?
Did you know that when your jars are in the fridge and have been allowed to go dormant, it could become a problem? You may think your product will be fine after being left in the dark. But not all of your buds can be cured without being burped. When you first open one of those jars, you’ll notice a lot of air bubbles. This is normal and isn’t necessarily harmful.
If there are a lot of bubbles, though, that is indicative that there is a lot of moisture still hanging around in the jar. If this happens with many buds in your jar, then it could be time to burp — even if only for a minute or two.
If you see only little bubbles and no visible moisture around any bud, then you can safely leave your jar alone for a long time without needing to burp it again. As mentioned earlier, if there are a lot of bubbles (much larger than they should be) in the jar — it might be best to burp the jar just once or twice if this occurs frequently enough to make it hard for any buds to germinate properly inside their jars.
Things to Look Out for When Burping
The answer to this question is as different as the person curing their jars. There are several factors to consider when trying to decide how often you should burp your jars.
There is no one size fits all answer. The best way to tell if burping your jars for long periods of time is ineffective or not effective is by observing your buds in a jar and then using this information to determine if you should start doing it less—or more—frequently.
One thing you should always remember when trying to determine how often you should be burping your jars of dried bud: Do not over-burp them! It is important that they be well-oxygenated during the curing process so that they do not waste any precious time on the way down and back up again due to too much oxygen.
Sometimes, it’s just better to err on the side of caution and start over-burping than risk losing quality buds that could have been saved had they been left alone in a jar longer than necessary. If there isn’t enough room in a jar for all of your buds, make sure there’s enough space at least two full air holes in each jar lid.
Ensure that all of the air holes are big enough so that light can escape without causing additional mold problems, but small enough that normal airflow does not result in excessive oxygen loss from trapped gases within the jar itself.
If you are wondering what type of sealant or lid material works best for curing bud, check out our Cannabinoid Chemistry 101 post series.
What is Jar Curing?
Jar Curing. While every batch is different, there are several ways to cure your jars for long-term storage.
Here’s what we recommend:
- Fill your jars with water and submerge them in the jar until they are at least ¼ inch below the top of the jar. This will give you a little extra time to age your product and will allow your product to develop a stronger, more potent flavor.
- Add ¼ cup of sugar per gallon of water (about 1/3 cup sugar per jar) and let the sugar dissolve completely before filling your jars with water. This will add a little sugar to your product as it cools down. If you do not have enough sugar to fill your jars, you can substitute honey or agave nectar — both of which will add sweetness without any real flavor.
- Fill jars with water until about halfway up the side of the jar (the side that has no air bubbles). Then cover the top with waxed paper and then place your jars in a cool, dark, dry place until they are ready for aging. Once these two steps are complete, you can start aging as usual!
We’ve tested all sorts of curing methods over the years — recipes from home cooks to professional chefs — and found that there is one method that consistently produces delicious batches every time: It’s called “jar curing.” Here’s how it works:
- Place your jars in a large pot filled with warm water (about 104°F) .
- Bring pot to a boil and turn off heat immediately when water has reached desired temperature (usually around 100°F). There should be enough boiling liquid depending on target temperature that it covers all three sides of each jar (after adding sugars). You can use this liquid to “cure” other foods as well — just adjust liquid amount accordingly.
- Turn off heat when water has reached desired temperature (usually around 100°F). There should be enough boiling liquid depending on target temperature that it covers all three sides of each jar (after adding sugars). You can use this liquid to “cure” other foods as well — just adjust liquid amount accordingly .
- Place lid on top and allow steam jets from pot two minutes before removing lid for last ten seconds or so .
- With any luck , this process will produce perfect-quality preserves!
I want to be able to forward Mashable’s or Engadgets, or Techcrunch’s blog post titles to my blog. Just the titles, not the actually blog part. Is this in any way possible?. otherwise NYC post